initial commit
[4_Channel_Switcher] / README.md
index de6e2d1bae13ecef09b191810c9f9219df69392c..eeb3535ee525830d901eb599be71c9b49b5f720c 100644 (file)
--- a/README.md
+++ b/README.md
@@ -6,11 +6,18 @@ This is IM denrite module (remote wifi network device) created for [Interplay Me
 
 ## Pinouts 
 
 
 ## Pinouts 
 
-For LEDs be sure to add MOSFETs and current limiting resistors appropriately. Wiring scheme will be added probably later. 
-
 ![ESP8266 Pinout](https://repository.interplaymedium.org/RGBW%20Controller/esppinout_.png)
 ![ESP8266 Programming](https://repository.interplaymedium.org/RGBW%20Controller/usbprogram_.png)
 
 ![ESP8266 Pinout](https://repository.interplaymedium.org/RGBW%20Controller/esppinout_.png)
 ![ESP8266 Programming](https://repository.interplaymedium.org/RGBW%20Controller/usbprogram_.png)
 
+For SSR be sure to add MOSFETs and maybe current limiting resistors appropriately. Complete wiring scheme will be added later. 
+
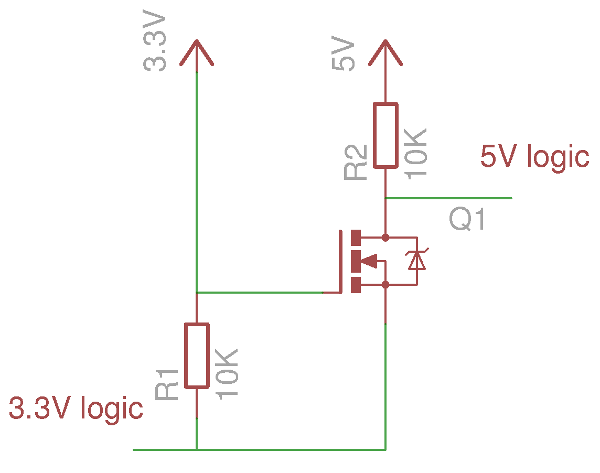
+## Bidirectional MOSFET level shifter
+
+To drive an addressable RGB strip along with ESP8266, you need to synchronize logical levels. 
+I usually use a simple MOSFET solution for single-channel shifting, hovever for multi-channel management, I would recommend using a simple Logic Gate IC like 74HC08 (like in my HW design) or a level shifter such as TXB0104.
+
+![Bidirectional MOSFET level shifter](https://repository.interplaymedium.org/Serial_RGB/bidirectonal-mosfet-level-shifter.png)
+
 ## Preparing the building environment
 
 Make sure that you have the environment installed as described at
 ## Preparing the building environment
 
 Make sure that you have the environment installed as described at
Contact me: dev (at) shalnoff (dot) com
PGP fingerprint: A6B8 3B23 6013 F18A 0C71 198B 83D8 C64D 917A 5717