The yellow LED connected to +3,3v via 470R
- GPIO 0 BCM17 LED green, booting
- GPIO 2 BCM27 LED red, video status
+ GPIO 0 BCM17 LED green, booting
+ GPIO 2 BCM27 LED red, video status
Lowering resistors are required for all diodes (Red LEDs normally brighter, so I would recommend ~470R for yellow and green and about 1K for red)
### Infrared interface
- GPIO 3 BCM22 IR TX
- GPIO 4 BCM23 IR RX
+ GPIO 3 BCM22 IR TX
+ GPIO 4 BCM23 IR RX
- 38kHz -- most popular
+ 38kHz -- standard
+-----------------------+ 3
- | data -> +---------------------o +3.3V
+ | +---------------------o +3.3V
| ______________ |
| / |
| ( | 2
- | \______________ + +---------------------o GND
+ | \______________ +---------------------o GND
| |
| | 1
- | - +---------------------o GPIO 4 (BCM23)
+ | data -> +---------------------o GPIO 4 (BCM23)
+-----------------------+
+5V
o
|
- | | 51 Ohm (depending on MOSFET maybe not required)
+ | | 51 Ohm (depending on MOSFET maybe not required)
|_|
|
_|_
\ /
- --- --> IR LED
+ --- IR LED
+ |
|
- MOSFET |
___ |---'
- o-----|___|-----|
+ o-----|___|-----| MOSFET
10K |->--
GPIO 3 (BCM22) |
|
### Analog Audio
- GPIO 1 BCM18 R AUDIO
- GPIO 23 BCM13 L AUDIO
+ GPIO 1 BCM18 R AUDIO
+ GPIO 23 BCM13 L AUDIO
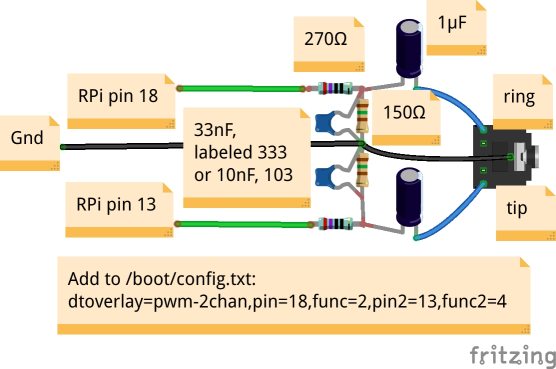
Picture taken [from here](https://shallowsky.com/blog/hardware/pi-zero-audio.html), thanks :)
Further operations are performed on device.
- ssh <your RPi device>
+ ssh <your RPi device>
Update repository list and install dependencies
- apt update
- apt install mc fbi omxplayer sox
+ apt update
+ apt install mc fbi omxplayer sox
Try to install freefonts (required by omxplayer)
- apt install freefonts
+ apt install ttf-freefont
By some reason recently *freefonts* package has been removed from official RPi repository. So in case of unsuccess just copy included freefonts to /usr/share/fonts/truetype/...
do it with *sudo*
- cp -r freefont /usr/share/fonts/truetype/freefont
- chown root:root /usr/share/fonts/truetype/freefont
- chown root:root /usr/share/fonts/truetype/freefont/*
+ cp -r freefont /usr/share/fonts/truetype/freefont
+ chown root:root /usr/share/fonts/truetype/freefont
+ chown root:root /usr/share/fonts/truetype/freefont/*
### IR interface setup
- apt install lirc
+ apt install lirc
edit /etc/lirc/hardware.conf
- # Run "lircd --driver=help" for a list of supported drivers.
- DRIVER="default"
+ # Run "lircd --driver=help" for a list of supported drivers.
+ DRIVER="default"
- # usually /dev/lirc0 is the correct setting for systems using udev
- DEVICE="/dev/lirc1"
- MODULES="gpio_ir_recv"
+ # usually /dev/lirc0 is the correct setting for systems using udev
+ DEVICE="/dev/lirc1"
+ MODULES="gpio_ir_recv"
edit /etc/lirc/lirc_options.conf
NOTE! add new line in the end of the file !!!! [known bug](https://forum.odroid.com/viewtopic.php?t=32181)
- driver = default
- device = /dev/lirc1
+ driver = default
+ device = /dev/lirc1
First try to find you device using
- irdb-get find YOUR_DEVICE
+ irdb-get find YOUR_DEVICE
-In case of unsiccess try to find and copy YOUR_DEVICE.conf for your remote controller to */etc/lirc/lircd.conf.d/*
-Here is a [list of devices](http://lirc-remotes.sourceforge.net/remotes-table.html) supported by Lirc 'from the box'. However, you always can record your own, see below...
+If you did it, copy YOUR_DEVICE.conf to */etc/lirc/lircd.conf.d/*
+In case of unsiccess try to find and copy here: [List of devices](http://lirc-remotes.sourceforge.net/remotes-table.html) supported by Lirc 'from the box'. However, you always can record your own, see below...
Copy template lircd.conf
- cp /etc/lirc/lircd.conf.dist /etc/lirc/lircd.conf
+ cp /etc/lirc/lircd.conf.dist /etc/lirc/lircd.conf
Make changes in */boot/config.txt* to set up PAL video output and run appropriate kernel overlays for IR interface:
- disable_splash=1
-
- # disable_overscan=1
+ disable_splash=1
+
+ # disable_overscan=1
- framebuffer_width=720
- framebuffer_height=576
+ framebuffer_width=720
+ framebuffer_height=576
- # enable PWM audio (add this line)
- dtoverlay=pwm-2chan,pin=18,func=2,pin2=13,func2=4
+ # enable PWM audio (add this line)
+ dtoverlay=pwm-2chan,pin=18,func=2,pin2=13,func2=4
- # uncomment for composite PAL
- sdtv_mode=2
+ # uncomment for composite PAL
+ sdtv_mode=2
- # uncomment if hdmi display is not detected and composite is being output
- # hdmi_force_hotplug=1
+ # uncomment if hdmi display is not detected and composite is being output
+ # hdmi_force_hotplug=1
- # Uncomment this to enable the gpio-ir module
- dtoverlay=gpio-ir,gpio_pin=23,gpio_pull=up
- dtoverlay=gpio-ir-tx,gpio_pin=22
+ # Uncomment this to enable the gpio-ir module
+ dtoverlay=gpio-ir,gpio_pin=23,gpio_pull=up
+ dtoverlay=gpio-ir-tx,gpio_pin=22
### Make IR works as TX and RX simultanoiously
Add these rules in */etc/udev/rules.d/71-lirc.rules* to get stable */dev/lirc-rx* and */dev/lirc-tx* device names:
- ACTION=="add", SUBSYSTEM=="lirc", DRIVERS=="gpio_ir_recv", SYMLINK+="lirc-rx"
- ACTION=="add", SUBSYSTEM=="lirc", DRIVERS=="gpio-ir-tx", SYMLINK+="lirc-tx"
- ACTION=="add", SUBSYSTEM=="lirc", DRIVERS=="pwm-ir-tx", SYMLINK+="lirc-tx"
+ ACTION=="add", SUBSYSTEM=="lirc", DRIVERS=="gpio_ir_recv", SYMLINK+="lirc-rx"
+ ACTION=="add", SUBSYSTEM=="lirc", DRIVERS=="gpio-ir-tx", SYMLINK+="lirc-tx"
+ ACTION=="add", SUBSYSTEM=="lirc", DRIVERS=="pwm-ir-tx", SYMLINK+="lirc-tx"
Change the device and listening address in /etc/lirc/lirc_options.conf:
- device = /dev/lirc-rx
- listen = 0.0.0.0:8766
+ device = /dev/lirc-rx
+ listen = 0.0.0.0:8766
Copy lirc_options.conf to lirc_tx_options.conf and edit these lines:
- device = /dev/lirc-tx
- output = /var/run/lirc/lircd-tx
- pidfile = /var/run/lirc/lircd-tx.pid
- listen = 0.0.0.0:8765
- connect = 127.0.0.1:8766
+ device = /dev/lirc-tx
+ output = /var/run/lirc/lircd-tx
+ pidfile = /var/run/lirc/lircd-tx.pid
+ listen = 0.0.0.0:8765
+ connect = 127.0.0.1:8766
Create */etc/systemd/system/lircd-tx.service* (from the output of *systemctl cat lircd*) and edit it like this:
- [Unit]
- Documentation=man:lircd(8)
- Documentation=http://lirc.org/html/configure.html
- Description=Second lircd, the transmitter
- Wants=lircd-setup.service
- After=network.target lircd-setup.service lircd.service
-
- [Service]
- Type=simple
- ExecStart=/usr/sbin/lircd --nodaemon --options-file /etc/lirc/lirc_tx_options.conf
-
- [Install]
- WantedBy=multi-user.target
- Create /etc/systemd/system/lircd-tx.socket (from the output of systemctl cat lircd.socket) and edit it:
-
- [Socket]
- ListenStream=/run/lirc/lircd-tx
-
- [Install]
- WantedBy=sockets.target
- Also=lircd-tx.service
+ [Unit]
+ Documentation=man:lircd(8)
+ Documentation=http://lirc.org/html/configure.html
+ Description=Second lircd, the transmitter
+ Wants=lircd-setup.service
+ After=network.target lircd-setup.service lircd.service
+
+ [Service]
+ Type=simple
+ ExecStart=/usr/sbin/lircd --nodaemon --options-file /etc/lirc/lirc_tx_options.conf
+
+ [Install]
+ WantedBy=multi-user.target
+ Create /etc/systemd/system/lircd-tx.socket (from the output of systemctl cat lircd.socket) and edit it:
+
+ [Socket]
+ ListenStream=/run/lirc/lircd-tx
+
+ [Install]
+ WantedBy=sockets.target
+ Also=lircd-tx.service
Create /usr/local/bin/irsend and make it executable
- #! /bin/sh
- exec /usr/bin/irsend --device=/var/run/lirc/lircd-tx "$@"
+ #! /bin/sh
+ exec /usr/bin/irsend --device=/var/run/lirc/lircd-tx "$@"
+ chmod +x /usr/local/bin/irsend
Start lircd-tx (with *sudo*)
- systemctl daemon-reload
- systemctl start lircd-tx
- systemctl enable lircd-tx
+ systemctl daemon-reload
+ systemctl start lircd-tx
+ systemctl enable lircd-tx
Enable RX (with *sudo*)
- systemctl enable lircd.service
- systemctl enable lircd.socket
+ systemctl enable lircd.service
+ systemctl enable lircd.socket
- systemctl restart lircd
+ systemctl restart lircd
NOTE: there maybe the Warning of duplication of "begin remote .. end remote", it is fine. Ignore it.
Reboot and check status :)
- systemctl reboot
+ systemctl reboot
- systemctl status lircd.service
- systemctl status lircd.socket
+ systemctl status lircd.service
+ systemctl status lircd.socket
### Test IR
Send some command. replace vendor and command with your
- irsend SEND_ONCE SONY-TV KEY_1
+ irsend SEND_ONCE SONY-TV KEY_1
Read RX
- irw
+
+ irw
Record your own (if you have no compatible remote control or incomplete config)
- systemctl stop lircd.socket
- systemctl stop lircd.service
-
- record with own key names
- irrecord --disable-namespace
+ systemctl stop lircd.socket
+ systemctl stop lircd.service
+
+ record with own key names
+ irrecord --disable-namespace
- systemctl start lircd.socket
- systemctl start lircd.service
+ systemctl start lircd.socket
+ systemctl start lircd.service
Force raw record mode (normally not required)
-
- irrecord -f -d /dev/lirc0 ~/lirc.conf
+
+ irrecord -f -d /dev/lirc0 ~/lirc.conf
+
+## IR remote setup and button assignment
+
+If everything went fine and your remote reading by Raspbery, you have to choose buttons that you going to use for Babooshka control. Here is a list of current commands:
+
+- next
+- prev
+- forward +10min
+- backward -10min
+- play/pause toggle
+- pause on switching-off
+- stop
+- audio track switch
+- subtitles switch
+
+This is how they marked in *remoteir.sh*
+
+To assign comands you need to edit "ARR_DOWN", "ARR_UP" and so on in *remoteir.sh*. Change it for that you see in *irw* stdout when pressing buttons.
+
+ irw
## Main package installation
- cd /home/pi/
- git clone <this repo> (see above)
- cd BABOOSHKA.TV/
+ cd /home/pi/
+ git clone <this repo> (see above)
+ cd BABOOSHKA.TV/
Make sure that all .sh files inside are executable (have x flag)
- ls --all
+ ls --all
if required make them *chmod +x *.sh*
Create */etc/systemd/system/splash.service* file and add there
- [Unit]
- DefaultDependencies=no
- After=local-fs.target
-
- [Service]
- StandardInput=tty
- StandardOutput=tty
- ExecStart=/home/pi/BABOOSHKA.TV/early_init.sh
-
- [Install]
- WantedBy=sysinit.target
+ [Unit]
+ DefaultDependencies=no
+ After=local-fs.target
+
+ [Service]
+ StandardInput=tty
+ StandardOutput=tty
+ ExecStart=/home/pi/BABOOSHKA.TV/early_init.sh
+
+ [Install]
+ WantedBy=sysinit.target
Activate the service
- sudo systemctl enable splash.service
+ sudo systemctl enable splash.service
### On boot launcher
Add this line to */etc/rc.local*
- sudo -H -u pi /home/pi/babooshka.tv/start.babooshka.sh > /dev/null &
+ sudo -H -u pi /home/pi/BABOOSHKA.TV/start.babooshka.sh > /dev/null &
reboot and test :)
Edit */boot/cmdline.txt*. Make sure that you have *console=tty3 quiet consoleblank=0* and *logo.nologo*, this is my cmdline:
- console=serial0,115200 console=tty3 quiet consoleblank=0 loglevel=1 root=PARTUUID=6c586e13-02 rootfstype=ext4 elevator=deadline fsck.repair=yes rootwait logo.nologo
+ console=serial0,115200 console=tty3 quiet consoleblank=0 loglevel=1 root=PARTUUID=6c586e13-02 rootfstype=ext4 elevator=deadline fsck.repair=yes rootwait logo.nologo
Disable blinking cursor (probably not required)
- vt.global_cursor_default=0
+ vt.global_cursor_default=0
Remove tty login service to eliminate blinking cursor
-
- sudo systemctl disable getty@tty1
+
+ sudo systemctl disable getty@tty1
## Additional software
If' you're going to watch videos from YouTube, Vimeo and so on, this packages would be required. Most porbably probably would beed to install youtube-dl globally. So do that with *sudo -H ...*. It would be recommended wor futher compatibility.
- apt install mkvtoolnix python-pip
- pip install -U youtube-dl
+ apt install mkvtoolnix python-pip
+ pip install -U youtube-dl
## Usage
-converting video (note -level 3.0 option! it is required for RPi HW codec)
+converting video. Note *-level 3.0* option! it is required for RPi HW codec. I've been breaking by brain until found that RPi HW codec can't play *low profile* (or maybe it is driver limitation). However [here is](https://superuser.com/questions/489087/what-are-the-differences-between-h-264-profiles) some technical details, if you interested in.
- ffmpeg -i FILEIN -vcodec libx264 -preset slow -level 3.0 -b 700k -s 720x404 FILEOUT
+ ffmpeg -i FILEIN -vcodec libx264 -preset slow -level 3.0 -b 700k -s 720x404 FILEOUT
upload new video from local PC
- scp <your_super_cool_kitten_flick.mp4> <babooshka>:BABOOSHKA.TV/VIDEO/
+ scp <your_super_cool_kitten_flick.mp4> <babooshka>:BABOOSHKA.TV/VIDEO/
download new video from youtube (on device)
- youtube-dl -f 'bestvideo[vcodec=avc1][height<=720]+bestaudio/best[abr<=120]' --merge-output-format mp4 -o '%(playlist_index)s - %(title)s.%(ext)s' <youtube link>
+ youtube-dl -f 'bestvideo[vcodec=avc1][height<=720]+bestaudio/best[abr<=120]' --merge-output-format mp4 -o '%(playlist_index)s - %(title)s.%(ext)s' <youtube link>
click PLAY button and enjoy :)
## Debug
- tail -F /tmp/babooshka.log
+ tail -F /tmp/babooshka.log
## Known bugs
you may not use this files except in compliance with the License.
You may obtain a copy of the License at
- http://www.apache.org/licenses/LICENSE-2.0
+ http://www.apache.org/licenses/LICENSE-2.0
Unless required by applicable law or agreed to in writing, software
distributed under the License is distributed on an "AS IS" BASIS,
See the License for the specific language governing permissions and
limitations under the License.
+## Donate
+
+If you would like to contribute to a project, you can always [help with a penny](https://paypal.me/shalnov).
+